Installing fDeploy Server
Before proceeding, make sure you have followed the steps described in installation prerequisites.
Install fDeploy Server
The fDeploy Server installer provides a guided setup wizard that automates the installation process.
- Run the
fDeployServer-Setupinstaller as Administrator - Select the installation directory (default:
C:\fDeploy Server) - Configure the database connection:
- SQL Server address (default:
localhost) - Database name (default:
fdeploy) - Username (default:
fdeploy) - Password
- SQL Server address (default:
- Click Test Connection to verify the database connection before proceeding
- Configure the URL bindings the server should listen on
- Set the initial administrator password for the built-in
adminaccount - The installer will:
- Copy application files and the web client application
- Configure
appsettings.jsonwith the database connection string and URL bindings - Create required directories (
Logs,Repository) - Register and start the fDeploy Server Windows service
URL bindings
The installer provides a dedicated URL Bindings wizard page for configuring the URL prefixes the server will listen on. Two defaults are pre-populated:
http://localhost:80https://localhost:443
From this page you can:
- Add a new binding — type it in the input box and click Add
- Update Selected — select a binding in the list, edit the input, and click Update Selected
- Remove — select a binding and click Remove
- Move Up / Move Down — reorder the bindings
Each binding must include the scheme, host, and port (e.g. http://localhost:80 or https://fdeploy.contoso.com:443). The installer validates each entry and rejects:
- Empty values
- Entries that don’t start with
http://orhttps:// - Entries that include a path
- Missing or invalid ports (must be 1–65535)
- Duplicates
At least one binding is required before the installer will proceed.
Initial administrator password
The installer prompts for the password of the built-in admin account on a dedicated wizard page. There is no hardcoded default password — the password you enter here is what you will use to sign in for the first time.
The password must satisfy the default ASP.NET Identity policy:
- At least 8 characters
- At least one uppercase letter (A–Z)
- At least one lowercase letter (a–z)
- At least one digit (0–9)
- At least one non-alphanumeric character (e.g.
!@#$%)
The installer writes the password to appsettings.json as InitialAdmin:Password. On the first service start, fDeploy Server creates the admin account with this password and wipes the value from appsettings.json so it never lives on disk long-term.
If admin creation fails (for example, because a stricter security policy has been configured and the password no longer satisfies it), the plaintext is left in appsettings.json and the failure is logged. Correct the value and restart the service.
Silent install
For unattended installs, pass /ACCEPTEULA to confirm acceptance of the Terms of Service and /ADMINPASSWORD= for the initial admin password:
fDeployServer-Setup.exe /SILENT /ACCEPTEULA /ADMINPASSWORD=YourStrongP@ss1A silent install without /ACCEPTEULA aborts with an error — there is no implicit acceptance.
The same password policy is enforced; the installer aborts with an error if the supplied password does not meet it.
Upgrading with the installer
When upgrading an existing installation, the installer will:
- Skip the database configuration page
- Skip the URL bindings page (existing bindings are preserved)
- Skip the administrator password page (the existing admin account is preserved)
- Preserve the existing
appsettings.jsonconfiguration - Automatically stop the running service before upgrading files
- Restart the service after the upgrade
Uninstalling
The uninstaller will stop and remove the Windows service. You will be prompted to choose whether to remove configuration files, logs, and repository data or keep them for a future installation.
Configure database
fDeploy Server requires a SQL Server database with full read/write permissions. At initial startup, fDeploy Server will initialize the database by creating the schema and populating tables with initial data.
The database connection is configured during the installation wizard. If you need to change the connection later, you can edit the appsettings.json file in the root directory where fDeploy Server was installed.
Sample connection string:
"ConnectionStrings": { "fDeploy": "Data Source=192.168.1.100;Initial Catalog=fDeploy;User ID=fDeploy;Password=YOURSQLUSERPASSWORD;Trust Server Certificate=True"},Connection string protection
The installer writes the connection string in plaintext. On the first service start, fDeploy Server automatically encrypts the connection string in appsettings.json using DPAPI (Windows Data Protection API, Local Machine scope). Encrypted values are prefixed with DPAPI: so they can be distinguished from plaintext.
This protection is fully automatic — no user action is required. After first start, the file on disk no longer contains the plaintext connection string. The service decrypts the value in memory on each startup.
Configure listening urls and ports
The installer collects URL bindings on the URL Bindings wizard page and writes them to appsettings.json. You can also edit the BindToUrlPrefixes array in appsettings.json directly after installation to add, remove, or reorder bindings:
"BindToUrlPrefixes": [ "http://localhost:80", "https://localhost:443", "http://fdeploy.intranet.yourorganization.com:80", "https://fdeploy.intranet.yourorganization.com:443"],After changing the bindings, restart the fDeploy Server Windows service for the changes to take effect.
Configure namespace reservation (URL ACL) (optional)
fDeploy requires namespace reservation for the URLs you wish to bind to if you are using non-standard ports (any ports other than 80 and 443). Sample reservations for both HTTP and HTTPS:
netsh http add urlacl url=http://fdeployserver.intranet.yourorganization.com:80/ user=\Everyonenetsh http add urlacl url=https://fdeployserver.intranet.yourorganization.com:443/ user=\EveryoneConfigure certificate (if using HTTPS)
If you wish to make fDeploy Server GUI available via HTTPS, you need to bind a SSL certificate. You can use a self-signed certificate generated by a trusted Root CA of your choice (your own organization CA, for example). If you have no such capability in your organization, you can order a standard SSL certificate from a CA of your choice. In order to bind a certificate to fDeploy Server, you can use the following command:
netsh http add sslcert ipport=192.168.1.100:443 certhash=REPLACETHISWITHYOURCERTTHUMBPRINT appid={9412ee86-c21b-4eb8-bd89-f650fbf44931}Make sure to use the IP address of the machine where you are installing fDeploy Server.
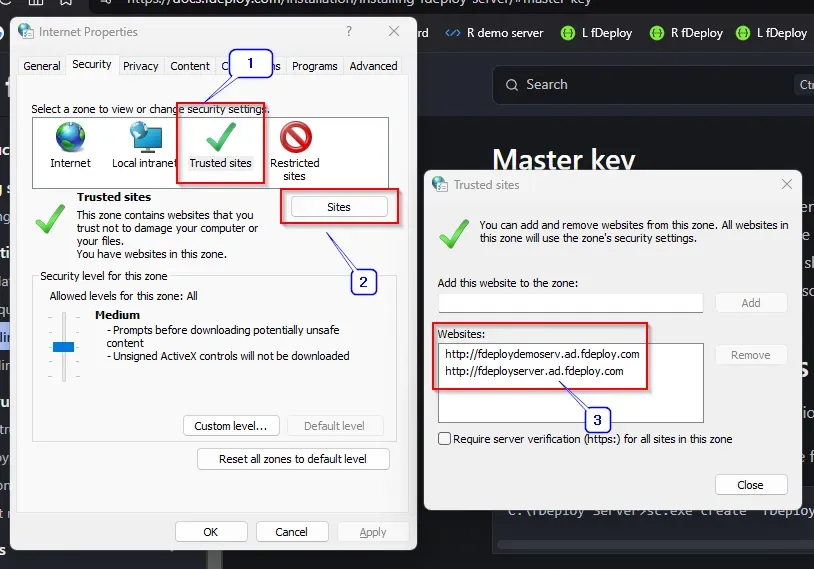
Configure group policy (optional)
Add fDeploy Server to your existing intranet site group policy. Using Group Policy Management Editor, navigate to:
User Configuration -> Policies -> Administrative Templates -> Windows Components -> Internet Explorer -> Internet Control Panel -> Security Page.
Finally, open the Site to Zone Assignment List and enter zone assignment for your fDeploy Server url with value name being for example http://fdeploy.intranet.yourorganization.com and value 2 (trusted sites).
In essence, client computers (from which your users will be accessing fDeploy Server GUI), should have a policy that looks like this once your group policy is configured and distributed (with your intranet site instead of “fdeploydemoserv.ad.fdeploy.com”, of course):
Configure firewall
Add a firewall rule to allow incoming TCP traffic on port 80 (if using HTTP) and 443 (if using HTTPS) to the machine where fDeploy Server is installed.
Master key
When executed the first time, fDeploy will generate a master key which will be used to encrypt/decrypt sensitive variable values. The generated master key is a random 256-bit AES key, encrypted using DPAPI (Local Machine scope) and stored in appsettings.json at the installation target directory.
Regenerating the master key
You can regenerate the master key at any time using:
fDeployServer.exe -generate-master-keyTo capture the plaintext key for immediate backup as part of the same operation, add -print-plaintext. The plaintext key is written to stdout while status messages are written to stderr, so you can redirect cleanly:
fDeployServer.exe -generate-master-key -print-plaintext > C:\Secure\fdeploy-master-key.txtBacking up the master key
To create an offline backup of the master key, use -get-master-key. This command prints the plaintext key to stdout so you can redirect it to a secure location:
fDeployServer.exe -get-master-key > C:\Secure\fdeploy-master-key.txtThe command enforces several protections to prevent unauthorized exfiltration:
- It must be run from an interactive console — piped or scheduled invocations are rejected
- You must enter valid fDeploy credentials for an account with the System Administrator role
- You must type the confirmation phrase
export master keyverbatim - Every attempt (successful or not) is recorded in the audit log
Store the exported key in a secure location such as a password vault, encrypted backup, or hardware security module. Anyone with access to the plaintext key can decrypt every sensitive project variable in the database.
Restoring the master key on a new machine
If you are reinstalling fDeploy Server on a new machine (for example during disaster recovery), you need to import the previously backed-up master key before the service starts. The -set-master-key command reads a base64-encoded key from stdin, encrypts it with DPAPI on the new machine, and writes it to appsettings.json:
# PowerShell$key = Get-Content C:\Secure\fdeploy-master-key.txt -Raw$key | & "C:\fDeploy Server\fDeployServer.exe" -set-master-key:: cmd.exetype C:\Secure\fdeploy-master-key.txt | "C:\fDeploy Server\fDeployServer.exe" -set-master-keyThe key must be a valid base64-encoded AES-256 key (32 bytes when decoded). After importing, start the fDeploy Server service as usual.
Default administrator account
On first startup, fDeploy Server seeds an administrator account using the password you provided during installation:
- Username:
admin - Password: the value you entered on the Initial administrator password wizard page (or passed via
/ADMINPASSWORD=for silent installs) - Team: Administrators (granted the System Administrator role)
After the account is created, the plaintext password is wiped from appsettings.json.
Logging
fDeploy Server uses Serilog for structured logging. Logs are written to:
- Console — when running as a console application
- Rolling log files — stored in the
Logsdirectory under the fDeploy Server installation path (e.g.,C:\fDeployServer\Logs\fDeploy_server_log_*.txt), rotated daily
Permissions required for the fDeploy Server windows service
fDeploy Server windows service requires a minimum set of permissions in order to function. You can change the fDeploy Server service properties by using the Services MMC snap-in (services.msc) if you choose to have the service run under a different user. By default, fDeploy Server windows service runs as Local System.
These are:
- Log on as a service
- Read Local Machine certificate store
- Load fDeploy Server certificate from the Local Machine certificate store
- Read/write permissions on the directory where fDeploy Server is installed (for example C:\fDeployServer)
- Read/write permissions on the fDeploy Server SQL database
Command line arguments
fDeploy Server supports the following command line arguments:
| Argument | Description |
|---|---|
-replace-certificate | Generate a new fDeploy Server certificate |
-generate-master-key | Generate a new master encryption key (overwrites any existing key) |
-generate-master-key -print-plaintext | Generate a new master key and also write the plaintext key to stdout for immediate backup |
-get-master-key | Export the plaintext master key to stdout for offline backup. Requires an interactive console, System Administrator credentials, and a confirmation phrase. Every attempt is audit-logged. |
-set-master-key | Import a base64-encoded master key from stdin, encrypt it with DPAPI, and save it to appsettings.json |
-set-connection-string | Import a SQL Server connection string from stdin, encrypt it with DPAPI, and save it to appsettings.json |
Configuring license
When you obtain a valid license, you can add it to your fDeploy Server in the server configuration area. You can find this area by navigating to /configuration/license or by clicking on the cogwheel in the top right corner and then selecting “License” in the left sidebar. Under “Edit license”, you can paste your new license and hit “Save” button to save changes.

Authentication
fDeploy Server supports multiple authentication methods:
- Local accounts — username and password managed by fDeploy Server
- Domain accounts — Active Directory integration for organizations with Windows domain infrastructure
- OpenID Connect (OIDC) — integration with external identity providers via OpenIddict
For detailed information on each authentication method — including how to configure domain (LDAP) and OIDC providers — see the Authentication documentation.
User management
fDeploy Server includes a built-in user management interface accessible to administrators. From the user management area, you can create local user accounts, assign roles, reset passwords, and manage user access. For details, see User management.